By now, we all know the benefits of installing an AC module. We, at Loom Solar are getting hundreds of queries from installers and consumers regarding the same, such as how can I install AC Module, how much solar power will be generated, how much money will I save, etc. AC module technology has come a few years ago, but solar industry leaders introduced this product in the utility scale projects where solar installation size starts from 10 kW. Many people are still not fully aware of this technology. But it is actually better than the traditional grid connected solar system.
Loom Solar has introduced Solar AC Module that is a substitute of traditional grid connected solar system (On grid solar system). This blog is for all those consumers who want to install an AC Module with Envoy Remote Monitoring Device. It is a Grid-tied solar system installation. This blog will also help installers who want to install Loom Solar AC Module with Envoy Remote. We have also installed AC Module in single phase where Net Meter was not installed.
There are two steps for a consumer who wants to install Grid-connected solar system.
Step 1: Install AC Module with Envoy Remote Monitoring
Step 2: Apply for Net Meter
Let us learn more about Envoy Remote Monitoring Device and Net Meter.
Envoy Remote Monitoring Device

Envoy is a remote monitoring device for AC module. It is a must have in all systems with 1 kW capacity. Envoy has multiple benefits for a customer. It provides data on web browser and also on Mobile app about your home power consumption. It provides information such as power production from solar panels and power consumption in your home.
- It does now allow Solar panels to produce more power than is required for your own consumption and ensures that no excess power is fed to the grid.
- It provides panel level power generation monitoring, so that you know how much power each of the solar panel is generating on a real time basis.
- In case of fault, there is no need to call service engineers. Your system fault can be taken care of remotely from Loom Solar corporate office itself.
Net Meter

Net meters are critical components in an on-grid solar power system. A customer will not be able to avail any credit without a net meter. Net Meter is just like Battery Bank. In foreign countries like the USA, the consumers store solar power into the grid during the day and use that solar power in the night. You can find out more about your state’s net metering policy by clicking here.
Step-By-Step Instructions to install a Loom Solar AC Module with Envoy Remote Monitoring Device in Single Phase Connection
Here is a detailed guide that you can follow to wire and fully install a Loom Solar AC Module with Envoy Remote Monitoring Device in 1-Phase Connection. We are using a one-panel stand as an example.
Step 1: Mounting Structure Installation

This step covers the process of installing the mounting structure/ stand and channels on the stand. Be careful while to fix the two with the help of nut and bolts. Make sure the stand and channel is firmly secured.
- Front Legs: Inner side of legs must be on the outside
- Channels: Capsule holes must be facing the sky side
- Tighten Nut & Bolts: Tighten the channels and legs with the help of nut and bolts
**Tighten the nuts and bolts with 18 No. key
**Channel inner side should be in outer direction
Step 2: Fix Legs with civil work using fasteners or bricks. Leave it for 4-5 hours for drying

You can use civil work or bricks to make sure the legs of the stand are firmly fixed on the ground.
Step 3: Mount the Panels

This step involves fixing the AC solar module firmly on the stand. Make sure the connection is tightly secured with the help of nuts and bolts.
- Place AC Module on mounting structure carefully
- Tighten AC Modules on channels using nut and bolts
- Tighten Micro Inverter with solar panel stand
- Tighten nut & bolt with 10 No. key.
Step 4: AC Module Wiring Connection

In this step, we will connect the Micro Inverter with AC Module with the help of Q-cable and MC4 connector. Tighten the connections securely with scotch-tape and keep it secured to protect from rain water.
- One side of Q-cable will use to expand just tape and leave it
- Connect DC Q Cable with Micro Inverter in DC Side
- Connect AC Q Cable with Micro Inverter in AC Side
- Connect DC MC4 Connector of Solar Panel with DC Q Cable of Micro Inverter
- Connect Phase (+) (Red Wire) & Neutral (-) (Black Wire) with recommended MCB.
- Connect AC Cable with MCB new AC Module
- Tight MCB with Cable Tie to protect with water
- Now, AC Cable near main Power Distribution Box
Step 5: Install Envoy Remote Monitoring Device for Single Phase Connection

In this step you can install your Envoy remote monitoring device (a product of Enphase Energy) which consists of fixing together the monitoring device, MCB box, two MCBs, current transmission system, etc. Use of multicolor wire is highly recommended for connection. MCB box needs to be fixed near the Envoy remote monitoring device on the wall or any surface area. Check for using the correct wire for connections. Once you are sure about the connections, check phase and neutral with tester and plug grid wire.
- Envoy Remote Monitoring Device
- MCB Box
- MCB
- Current Transmission (CT)
- Wire Cutter
- Multicolor Wire Recommended for Connection
- Tester
- Fix MCB Box near Envoy Remote Monitoring Device on Wall/Surface area
- Fix Envoy remote monitoring device on Surface area near MCB box
- Cut 2 small wire (6 inch)
- Cut 2 Wire to connect MCB with Envoy
- Combine both Wires and Put in MCB
- Tight Red Wire in MCB’s Right Side and Black wire in Left Side
- Install MCB for Grid Power and Solar Power in MCB Box
- Install CTs in Incoming Solar Phase Wire and Going Load Wire
- Connect to Envoy in Production Side
- Connect Solar Wire in Right Side MCB
- CT Arrow Direction in Current Flow Side
- Wire Connection Grid & Solar Phase with Phase and Neutral with Neutral
- Now, Another CT is connecting on Load Wire
- Connected Second CTs wire to Envoy in Consumption side
- Connecting AC Cable with Grid Power
- Check phase and neutral with tester and plug grid wire
- Connect Phase (Red Wire) with Phase and Neutral (Black wire) with Neutral
- Connecting Grid wire with left side MCB
Now, we have successfully installed AC Module with Envoy Remote Monitoring Device.
**Check connection carefully then start power supply
Step 6: Envoy Remote Monitoring System Configuration

This step involves configuring your Envoy remote monitoring device which will help you track the performance of your solar system, identify any default in the working and resolve the same remotely with the help of web based browser and a mobile app.
- Download & Install Installer Toolkit from Play store in your android/ iPhone
- Log in on Installer Toolkit
- Connect Envoy with Installer Toolkit on your phone
- Enable Wi-Fi Setting and Connect with Enphase Envoy Wi-Fi
- Automatically Software will update
- Set No. of Micro Inverter and Grid Profile (Set No Export: If Net Meter has been not installed, CEA 2016 230: If Net Meter has Installed)
- Now, Click on Start Scan
- Now, Connect Envoy Device with Wi-Fi Network
- Search Enphase Enlighten Login and Click on the Sign in Page
- Check Production and Consumption Online
Single Line Diagram of 3kW - 1 Phase AC Module Installation

When you are going to install AC Module - Single Phase or Three Phase, we give SLD of installation. You can download it from here.
**Here is a detailed video to help you with the installation. Watch Video
AC Module Installations in India

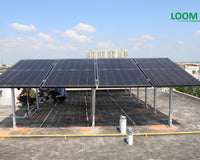
We have installed 1000+ AC Modules in Homes across India. Below are given some our installations.
- 350W AC Module Installation – Residential Home in Bhuwana, Udaipur (Rajasthan)
- 3 kW AC Module Installation – Residential Home in Kantapukur Lane, Burdwan, (West Bengal)
- 3 kW AC Module Installation – Residential Home in Nakodar, Jalandhar (Punjab)
- 3 kW Grid Connected AC Module Installation in Faridabad, Haryana
- 4 kW Grid Connected AC Module Installation in Gurgaon, Haryana
Conclusion
We hope you find this AC Module installation guide useful. This blog is made for consumers and installers who want to use AC modules for its numerous benefits, but are clueless about how to get it installed. This guide will help to solve that problem. It not only gives directions about installing the AC Module but also explains how you can connect the same with a remote monitoring device which helps you to track the performance of the newly installed system and rectify any defaults that creeps in remotely. Loom solar is present 24*7 to help you with any assistance that may be required for installation and maintenance. Send us your message and we'll get back to you within 2 business hours. You can also Call or whatsapp us at 8750 77 88 00, email: sales@loomsolar.com or visit our corporate office at Faridabad.